Monday, January 28, 2013

How to Build a Pump Enclosure

I just finished a new video that describes how to build a pump enclosure. Enjoy!

Here are some pictures along with a brief description of the major steps.

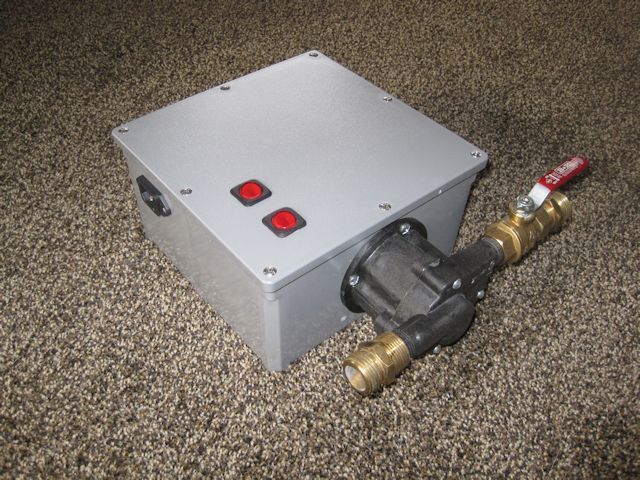
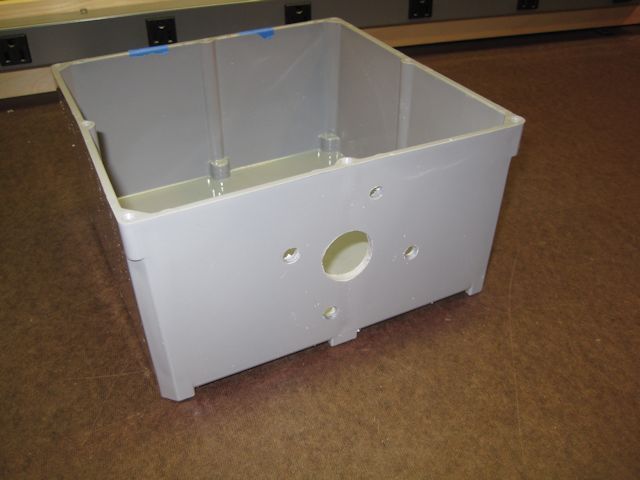
1. First, obtain a plastic box. I found that a Carlon 8" x 8" electrical box works well. Here is the box with a few holes for the motor and the pump housing. The pump housing will be reattached to the motor, sandwiching the box between the two.

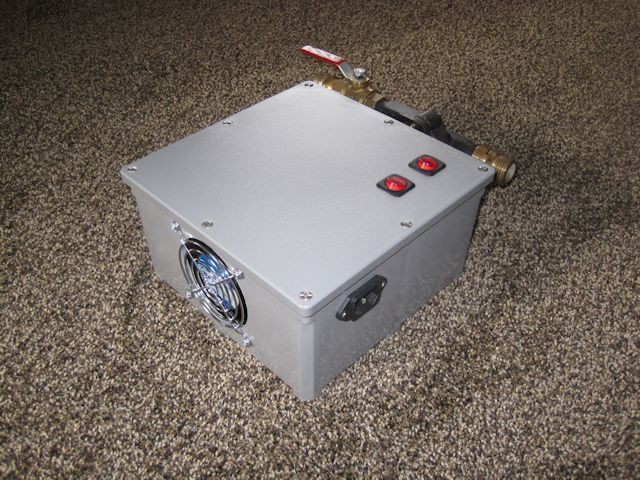
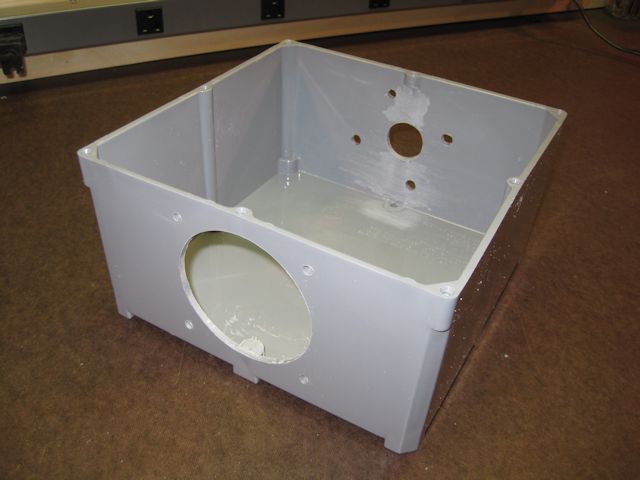
2. Opposite the holes for the motor, cut 4 holes for the fan and grille mount, and then a large hole for the exhaust. A hole saw or circle cutter works well for the larger hole. Not shown, but be sure to drill about 8-12 holes under the motor so that when the fan runs, it draws air across the motor and out the back.

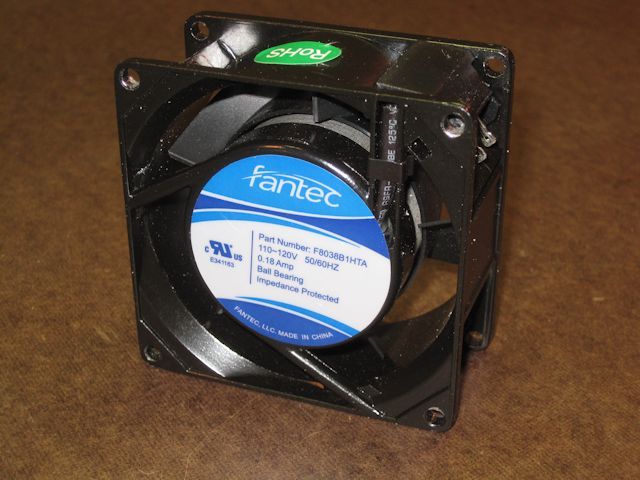
3. The fan you choose should be a 110 volt AC fan. Here is the one I used, bought from FrozenCPU:

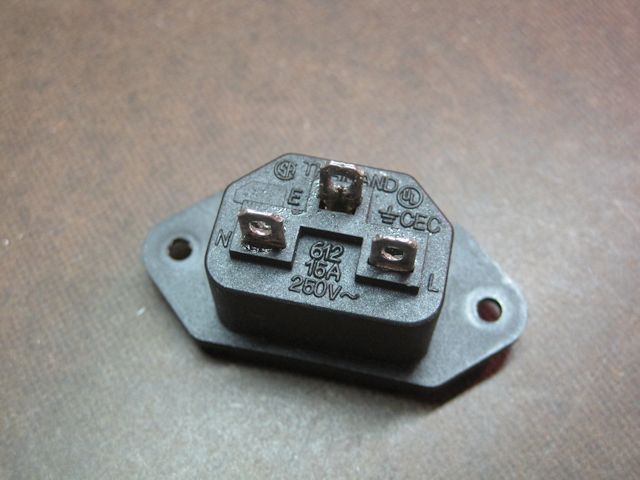
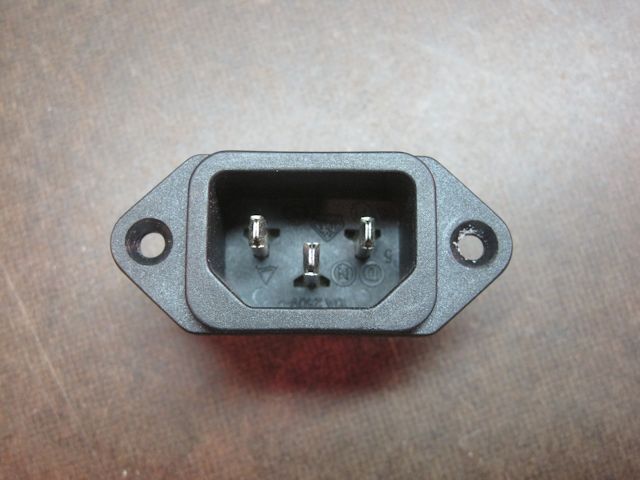
4. For power, I found that a PC power supply plug works well. You'll probably have to clean solder off the back connectors. Here are a couple views of the front and back of the plug:

Note the letters to help you connect the correct wiring inside the box:
L = Line (black)
N = Neutral (white)
E = Earth/ground (green)

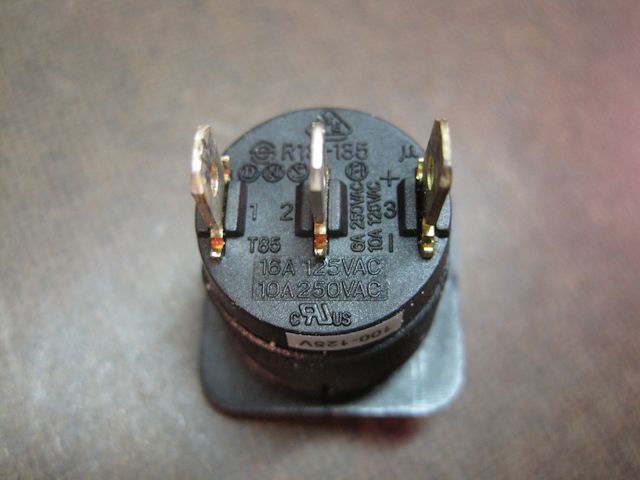
4. The switch can be a simple on/off, but I chose a lighted one. Here is what the connectors look like on the back of the switch:
This switch was from Radio Shack, and has the following mapping for the connectors:
1 = Line (black)
2 = Load, also called switched line (also black)
3 = Neutral (white)


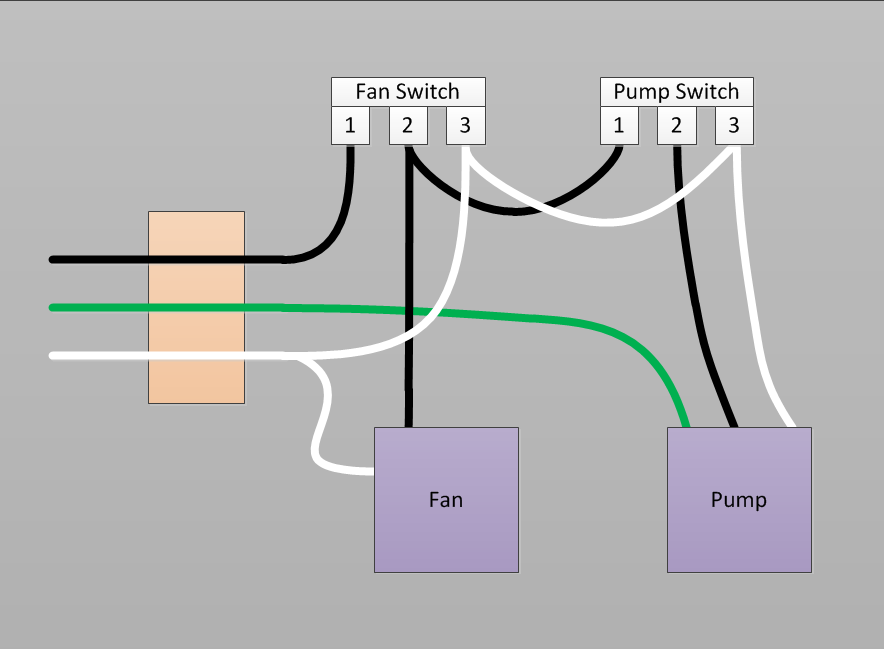
5. Here is a wiring diagram for lighted switches:

A little explanation:
  • Power goes to fan switch connector #1.
  • Fan switch connector #2 sees power when the fan is switched on, and sends power to the fan and also the motor switch.
  • The pump switch connector #1 only sees power when the fan switch is on. When this occurs, and then the pump switch is closed, it send power out pump switch connector #2 to the pump.
  • All neutrals are tied.
  • Only the pump needs the ground, direct from the PC power plug.

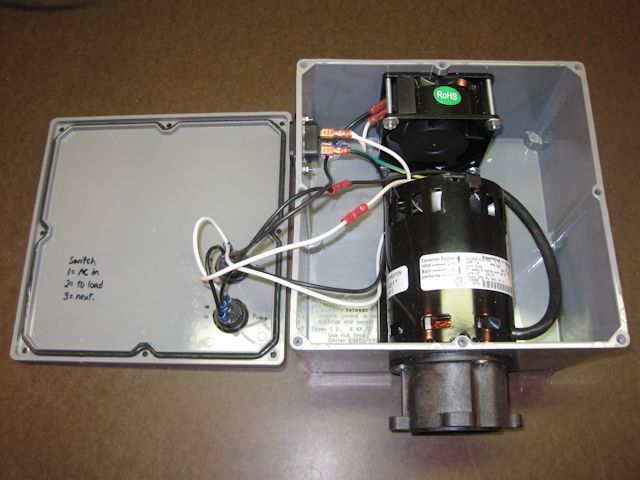
6. Wiring complete:
You can use crimp connectors (shown here) or you can solder.


7. Final product:


A couple notes:
  • When you test, be sure to remove the pump impeller housing. This is so that you don't run the impeller dry. You can reattach it once you know everything works, and plan on having fluid in the housing.
  • Always use a GFCI outlet when testing or operating the pump.
  • Do not attempt this if you are not comfortable around electricity.
  • Keep hand clear of electrical parts when you have the lid removed and you have the power hooked up.
  • Be sure to follow your pump's recommended lubrication schedule. This will require removal of the lid and oiling through the galleys on the motor.
  • Install a couple small rubber feet on the underside so that the vent holes can get plenty of air.
Sunday, January 29, 2012

Oxidation in Beers

I'll admit I had a flavor problem that I had a difficult time tracing, and it ended up being oxidation. This article will describe how I arrived at the conclusion that oxygen was to blame, and also how I addressed the issue.

The curious thing about the off-flavor was that my beer tasted perfect when primary fermentation was done, when I transferred to secondary, when I transferred to the keg, and probably 2-3 weeks after that. However, as the beer aged, it took on tastes similar to sherry or cough syrup...regardless of the style of beer.

John Palmer writes about off-flavors in his How To Brew publication (see section 21.2), and this helped confirm the flavor. Additionally, a couple friends offered advice on how to diagnose and address it. I'll admit I was somewhat lax when it came to preventing oxidation, so I took the following steps:
  • When I transfer beer to the secondary, I purge the secondary vessel with CO2, and siphon slowly, all while flowing CO2 gently.
  • When transferring to the keg, I follow the same procedure: flowing CO2 into the keg during transfer.
It doesn't hurt to make a few other changes that were probably overdue, or just good practice, so I also did these:
  • Replaced all beverage and siphon tubing.
  • Ran PBW through by counterflow chiller multiple times, and let it sit for a while, too.
  • Ferment in glass (I will be avoiding white food grade plastic, as it is not impermeable to oxygen, and also can take on flavors).
  • Use only the refractometer Santa gave me from now on.
  • Watch my sparge temperatures more carefully.
So far, the chocolate coffee oatmeal stout I made has passed the 4 week mark, so I'm pretty confident the problem was either solely oxidation, or oxidation plus old serving/siphon lines. If you notice a sherry-like or cough syrup taste (I never got the cardboard taste many describe), you may have the same issue that plagued a few of my beers. It is a terrible waste to spend all the time, effort, and money on great beer, and have it spoil!

Saturday, December 03, 2011

Instructional: How to Make a Mash Tun

In my previous post, I put up a video and promised to post more details. Here is a step-by-step guide that accompanies the video I made. There is much more space here, so if the video left you with a few unanswered questions, hopefully you'll find what you need by reading this.

Overview
I needed to make a new mash tun because my current one, a 5 gallon drink cooler, was too small. It only held about 12 pounds of grain, and prevented me from making big beers and 10 gallon batches. The solution was to build a much larger mash tun. You'll see how I designed the mash tun, starting with...

The Cooler
I selected a 52 quart Coleman cooler from Kmart. It cost $35, has plenty of room for grain, and also accommodates the manifold design.
Front view
Side view, the drain valve will be removed
Note the valley by the drain valve

Manifold Design Considerations
I currently do fly sparging, so there were a couple design considerations to support this. The first was even slit distribution so that drainage is even, and the second is proper spacing of the manifold across the bottom and away from the edges. However, I will want to do batch and no-sparge in the future, so the number of slits needed to be high enough to allow for fast drainage.
Exploded view of manifold and valve
From left to right:
  • 1/2" threaded brass ball valve ($7.32)
  • Brass washer ($1.09)
  • Rubber o-ring (about $2 for a pack of 10)
  • 1/2" x 2" brass nipple ($4.56)
  • Rubber o-ring
  • Brass washer
  • 1/2" copper female adapter ($4.17)
  • 1/2" type L copper piping (3 24" lengths, $7.44 per unit)
  • 1/2" copper tees (8 at $0.97)
  • 1/2" copper caps (5 at $0.68)
  • Not shown: 1/2" copper street 90 (2 which I had already)

Exploded view of valve assembly
Valve assembled, cooler wall will occupy space between o-rings

Dry Fitting
Once the measuring was done (took advice from John Palmer's How To Brew online resource, appendix D) and the plan was put on paper, the pipe needed to be cut. You can use a reciprocating saw with a 18 tpi metal blade, a hack saw, a multi-tool, or a pipe cutter. I have the latter, and it simply involves rotating it around the pipe and gradually screwing in the cutting wheel.
A pipe cutter makes nice even cuts
Here is the dry fit
Soldering
Some people fit the pipe and fittings together with friction, but I prefer soldering because it makes it nice and solid so it won't come apart when I stir the mash. The image below shows what is needed.
Torch, solder, q-tips for applying flux, the flux, and sandpaper
First, sand the ends of the copper piping. This exposes bare copper, which will more easily accept the solder.

Do the same with the inside of the fittings where the copper pipe will be joined.

Apply flux to the outside of the pipe where you just sanded. The flux is an acid-based paste that cleans the pipe when it gets heated, so that the pipe will better accept the solder. Since it is acidic, I use a q-tip to apply it.

Repeat the process for the inside of the fittings to be soldered.

When you're done applying flux and assembling, it should look like this, ready for soldering. I put scrap piping under the manifold to lift it off the wood so that it can be heated without burning the wood.

When you solder, apply heat to the fitting. You'll probably see flux dripping out of the joint, and maybe hear some crackling as it heats up. Then gently touch the solder to a joint. If the copper is hot enough, the solder will get sucked into the joint and migrate around it. If this doesn't happen, just apply a little more heat and retry.
Applying heat with propane torch

Solder just beginning to migrate into joint
Remember that this manifold won't be seeing any pressure, so the soldering doesn't need to be as perfect as it would be for a water line. The solder is just keeping it from coming apart.

Slitting the Manifold
After soldering and allowing the manifold to cool off, I was time to slit the piping. An important point to remember is that fly sparging requires even distribution of the slits, so only the long horizontal pipes need to be cut. If the short cross-pieces get cut, you'll end up was a zone where drainage will be favored, potentially making your extraction uneven.

For making the slits, you can use a variety of methods:
  • Hack saw: labor intensive, difficult to get into tight areas
  • Reciprocating saw: costly, fast, little difficult to control, difficult to get into tight areas
  • Multi-tool: medium cost, blades are expensive
  • Dremel tool: medium cost, very accurate, you'll go through a few cutting wheels
Whatever method you select, just make sure your slits are fairly evenly distributed, even through the tees.
Partially slit manifold, clamped to work bench

Fitting the Valve
Remove the drain from the cooler and install the valve assembly. Be sure to use teflon tape on the threads, and tighten well. It's a good idea to partially fill the cooler with water and let it stand for a while as you look for any leaks.
Exterior view of installed valve
Interior view, after water test
Installation
The manifold needs to be cleaned before it gets installed, because it has burrs from the slitting, and it still has flux from the soldering. I simply sanded the outside with fine sandpaper, and sanded the inside with a strip of sandpaper that I put through a flute cleaner and ran through with a drill. This got rid of a bulk of the burrs this way. For the flux, I used carburetor cleaner, which is mostly alcohol. This stripped away the flux really well, and I cleared the manifold further with hot soapy water after that.

Installed and ready for mashing
A couple points about the installation:
  • I added 2 street 90s on the end to keep the manifold centered in the cooler.
  • The drain assembly is lower than the manifold, so I used a piece of PVC braided hose to join them. It fits very snug, so there is no need for a clamp (but feel free to add one if you'd like).
  • To allow for easy cleaning of husks and grain particles, the caps are removable. To keep them in place, simply squeeze the end of the pipe very slightly with some channel locks, and then push the cap on.
  • To provide easier access, I removed the hinges from the lid while I was working. I've decided to keep the hinges off so that I can have unencumbered access during mashing.
  • Since my mash tun was young, inexperienced, and plastic, I named it Mashtun Kutcher. ;^)

Mashtun Kutcher in action, fly sparging for an imperial IPA

Thursday, December 01, 2011

Video: How to Make a Mash Tun

I just finished editing and posting a youtube video on making a mash tun from a picnic cooler. Look for a blog post with details here soon. Until then, enjoy!

Monday, November 28, 2011

Brew Session Illustrated

This weekend, I made a batch of Imperial IPA from this recipe. Had my friends Eric and Tina over to help make the beer, and we also got to sample some homebrew. Tina made a phenomenal Irish Red that has a big hit with everyone!

So here is a pictorial of the session.

1. Add water to the HLT (Hot Liquor Tank). The amount that will be added to the mash tun will be about 1 quart per pound of grain. In this case, that works out to 17 quarts, but I round up to 5 gallons to heat (I'll only use 17 or so quarts of that for the mash).

2. Here is a picture of the water in the HLT. I put a floating thermometer in here to monitor the temperature.

3. Whenever I have a burner running, I run these fans on high. They are attached to a piece of plywood that fits into my walkout basement door frame, and push basement air out. On the other side of my basement, I have 3 windows open to supply fresh air. If you brew indoors, always keep a CO detector nearby!

 4. Here is the burner lit under the HLT, getting the water up to around 165 Fahrenheit degrees. They are simple turkey fryer burners that I modified for natural gas. Propane is delivered at high pressure, so the orifice (brass part) has a very small opening. Since natural gas is delivered at much lower pressure, I simply drilled out the orifice to allow more gas through.

5. While we wait for the water in the HLT to get up to temperature, we can crush the grain. Since 17 pounds is a lot of grain, I opt for a cordless drill running in low gear and a medium speed.

6. When the water in the HLT got to 165, we combined the crushed grain and hot water in my newly designed mash tun. Stir well to break up dough balls! I fine-tune the mash with some cold water until the mash reads about 154 on my floating thermometer. Then it sits for about 1 hour to allow the enzymes to convert starch into sugar.

7. While the mash is sitting for an hour, I add more water to the HLT and heat it to around 180. This will be used to sparge (rinse) the grain in the mash tun. The grain bed needs to be "set" in order to clear the manifold of grain husks and particles. I use my March pump to slowly reintroduce the wort back into the mash tun. It only takes a pint or so until the wort is clear (it will be foggy, but no chunks).


8. Here is a picture of the fly sparge operation. You can see the HLT on the left introducing 180 degree sparge water into the mash tun, and the March pump pushing hot wort from the mash tun to the boil pot. It is important to have the HLT water diffused so it doesn't drill a hole through the grain (see blue coffee can lid above), and drain slowly by throttling the pump output.

9. Here is what the pump discharge looks like going into the boil pot.

10. One of many hop additions. It is, after all, an IPA we're making!

11. During the boil, I like to multi-task a little. This means cleaning out the mash tun, the pump, the hoses, etc. Also, sanitize anything that will contact cooled wort. See my post on Saving Time Brewing for more ideas.

12. Then after the boil is done, I give the wort in the boil pot a good stir in one direction to "whirlpool" it. All the hop particles and the hot break forms a cone in the center, away from the output port. This means less of this will end up in the fermenter and, ultimately, the beer. Here, the counterflow chiller is attached and ready for action.

13. Run the chiller and drain the first few ounces to clear the valve. This junk gets dumped.


14. Take a gravity reading. I was little low.

15. Here is the chiller running. With nice cold NY water, it brings the wort from over 200 degrees to around 62 degrees. I can control the wort flow and the water flow to get the right temperature going into the fermenter.

16. I made a yeast starter, so it is going in now. I always add the yeast about halfway through so that I can be guaranteed that the wort is at the right temperature. For example, if it is too hot, I will crank the water flow and throttle back the wort valve. If the wort is too hot, it can kill the yeast.

17. Here is a good view of the cone I mentioned in step 12. It is pretty apparent once most of the wort has drained from the boil pot. You can see the output pipe at around the 11 o'clock position.

18. To get the most out of the boil pot, I wedge a piece of wood on the back side to tilt it forward a little.

19. Once all of the wort is out of the boil pot, it helps to aerate the beer (wort+yeast) that is in the fermenter. Some people use an oxygen stone, some use air, other like to stir a lot...I use a paint stirrer on the end of my cordless drill to whip it up.

20. Here is the fermenter, all sealed up. It started bubbling within 12 hours, thanks to a healthy starter, plenty of sugar, and a good whipping!